OE - ORDER ENTRY
(Optional Program)This is an Optional BSMGR program.
(Call BSMGR if you are interested in purchasing this program.)
| Screen 1 | Screen 2 |
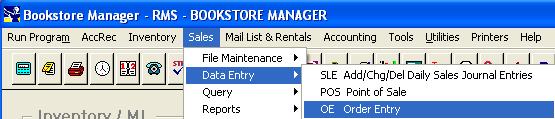
To open OE, press <Alt M> ("Menu") and follow the Menu path illustrated below, then press <Enter>, or simply enter <OE> in the "Enter Program Name" field and press <Enter>.
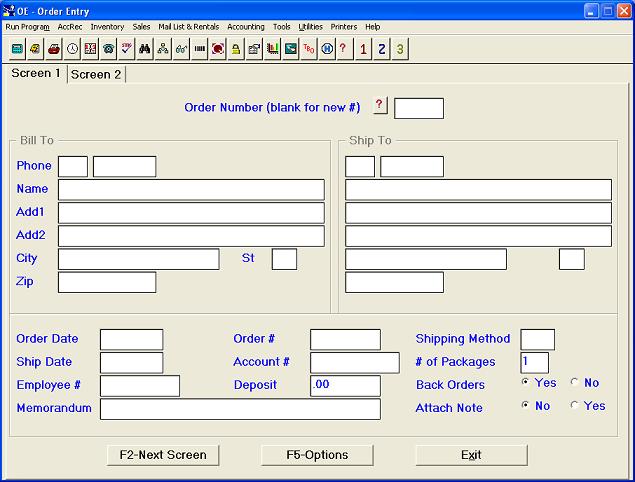
Enter the order number of an existing order, using <F3> to lookup if necessary, and press <Enter>. The order will be displayed and changes can be made.
Or
Begin a new order by pressing <Enter>. At the message window, enter your "Employee #," and press <OK>. A number will be given for the new order.
Enter the telephone number. The mailing list (MLM) will be checked and, if found, the customer’s name and address will be transferred to the order. If the telephone number is not found, you are given the opportunity to put the customer on the mailing list. When the mail list entry is saved, the information will be transferred to the order.
If the customer has an Accounts Receivable account (ARM) set up and tied to the mailing list, credit information will be displayed. The credit information shows the account number and name, special instructions, and the account balances. Press any key to continue.
If the order is to be shipped to the same name and address as the billing address, enter the word <SAME> in the "Name" field. If the order is to be shipped to another name and address, fill in the pertinent information.
The date of the order will be automatically entered.
Enter the date in this field when the items are shipped. (The date needs to be entered in this field when items are shipped so they will not appear on the OEP "Orders not Shipped" report.)
This field will be filled in as a result of the "Employee #" entry made at the beginning of the order.
Enter any special information. This information will transfer if item(s) are out of stock and special order made.
Will automatically be filled in. Order number will transfer if special order is made.
If the mailing list name has a related Accounts Receivable account, the account number will be transferred. Or, you may enter the account number for the customer if the customer has a charge account.
Enter any amount that has been prepaid on this order. (For reference only. This does not automatically credit at POS.)
Enter how the items should be shipped.
The "# of Packages" can be entered after the items are pulled and packed to mail. This also determines the number of mailing labels to be printed. If you do not use this information for printing mailing labels, leave it blank.
Will default to "Yes." Enter "No" if the item is out of stock and the customer does not want it ordered. If backorders are accepted, and the item is out of stock, change the order to reflect that the item is backordered. When the order is rung up at the Point of Sale, a special order will be created for the backordered items. When all items on an order are to be backordered, select F5=Options and choose "BO/Save." Special orders will be created for the items.
On the special orders:
The "Bill To" name will be transferred to the special order if no name or address is entered in the "Ship To" field.
The "Ship To" name will be transferred to the special order if items are to be shipped to another person.
The order number, billing account number, and memorandum information will be transferred to the "Special Information" field on the special order.
"OE" will be entered in the "Initials" field on the special order.
Note: You cannot use "OEPOS" to sell items that are backordered unless you delete the items already rung up and change the status to "shipped." It will be noted that the order has already been rung up, but you may re-ring it up.
Will default to "No." If you enter "Yes," a window will pop up giving you four lines for any note you might want to add. The note will print at the bottom of the picking ticket.
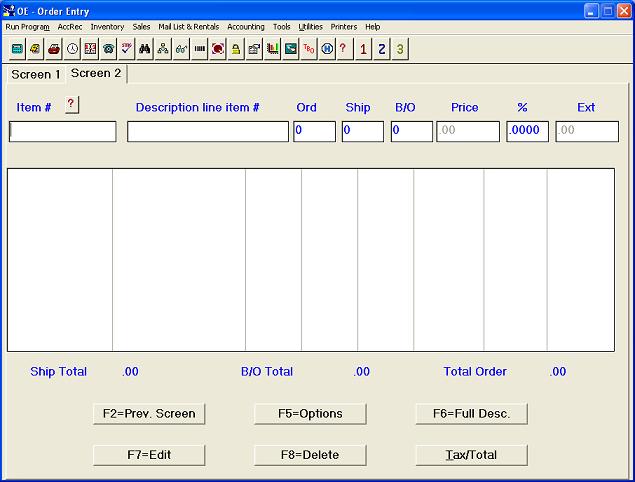
Enter the "Item #" and, if the item is found in your inventory, the description and price will be transferred. Or, press <F3> to lookup an item in IVI ("Inventory Inquiry") or IVDI ("Database Inquiry"). If the item is found in IVI or IVDI, press the "Transfer" option at the bottom of the inquiry screen to transfer the information to the order. If the item number entered in the "Item #" field is not found, a window will be displayed allowing you to enter non-inventory item information. (The "Author," "Vendor" number, and the "Sales Dept" on the cash register where item will be rung up.) If item is a non-inventory item and you have the item in stock, you MUST put in the "Sales Dept" number in order for the item to be rung up using "OEPOS" at Point of Sale or the "POS/Save" option under F5=Options. If the item is backordered, you MUST enter the "Vendor" number so the item will be ordered. If number is not entered, the "Vendor" number will default to "999." If you have a publisher number "999" set up, you may divert the special orders to the distributor if running an "IVWO" work order report for multiple vendors. A special order without a vendor number will not be ordered on a purchase order for a primary supplier.
You may also enter the catalog number in this "Item #" field by entering <C>, a space, and the catalog number. The item will be rung up at POS using the catalog number.)Note:
Note: The order will accommodate up to 80 item entries.
If transferred from inventory, the title/description of the needed items will be automatically entered. If not, enter the title/description of the item ordered.
Enter the quantity the customer needs.
Enter the quantity to be shipped.
Enter the quantity to be backordered. If you find, after taking an order, that an item is out of stock, select the F7=Edit command to change the order to reflect the quantity back ordered, or delete the item if the customer does not accept backorders.
If the item is in inventory, the price will be automatically entered. If not in inventory, you will have to enter the price manually. A price MUST be entered to ring up at the Point Of Sale using "OEPOS" or the "POS/Save" option under F5=Options; otherwise, a message will be displayed telling you that the item does not have a price, and none of the items on the order will be rung up. You will have to either change the order to reflect the price or manually ring up the items.
If a discount is given for the item, enter the discount percentage amount and select one of the displayed discount options to identify the type of discount you are giving.
The extended price will be automatically entered.
Command Buttons
F2=Prev. Screen - Allows you to return to "Screen 1."
Save - Saves the order.
Print/Save - Prints a picking ticket and saves the order. (In addition to the item information on the order, the picking ticket will print the "Category" and "Location" of the item.)
Delete - Deletes the order.
Undo - Cancels any changes made in existing order or cancels new order entries.
POS/Save - Rings up order on Point of Sale, and then allows you to enter shipping charges, etc. and to charge to an Accounts Receivable account or a bankcard. A special order is made for backordered items. If the backordered items are already on a purchase order, the IVN ("Locate an item on a P.O.") screen will be displayed. You may attach the special order to the purchase order at this IVN screen by selecting the Allocate=F5 command button to tag the item on the purchase order for this special order. Select Cancel=Esc to continue with the POS transaction for the items on the order that are not backordered.
BO/Save - Creates a special order and saves the order. "Create Special Orders for Back Orders?" will be displayed. Select "Yes" to create the special order. If you select "No," no special order will be created and the order will not be saved.
Note: If "Yes" is selected in the "Back Orders" field on "Screen 1," a special order will automatically be made for backordered items when the rest of the order is rung up at POS. Therefore, you should only use the "BO/Save" option when all items on an order are backordered.
- - Cancels the "Options" screen and returns to order entry screen.
Cancel Options Screen
F6=Full Desc. - If the title is too long for the "Description Line Item #" field, this command will display the full title.
F7=Edit - Allows you to make changes in item entries.
F8=Delete - Allows you to delete an item from the order.
Tax/Total/Ship - Allows you to view the tax, etc. information. The tax computation is a simple multiplication of Tax Rate #1 times the taxable sale. If you desire to exempt a particular item on the order from tax, this must be done at POS.
After the order is entered, pull the items from your stock. If any items are not in stock, bring the order back up on the computer, select F7=Edit, and make the necessary changes. If the customer wants to backorder items that are not in stock, enter the quantity in the "B/O" field. If the customer does not want items backordered, delete the items from the order or change the "Ship" field quantity to zero. Ring up order using the "POS/Save" option under F5=Options or, at the Point of Sale, ring up the order using "OEPOS" in the "Item #" field, as explained below:
To ring up the order at Point Of Sale, enter <OEPOS> at the "Item #" field. At the pop-up "Order Entry" window, enter the "Order #" and select OK.
The items on the order to be shipped will be automatically rung up. The sale will not be totaled, so you can add postage, etc.
If any items are backordered, a special order will be made for the items. Information from the "Order #," "Account #," and "Memorandum" fields of the order will be transferred to the "Special Information" field of the special order. If the items are shipped to another person, the "Bill To" name will also be transferred.
The invoice will be printed, and mail labels will be printed. The number of packages put on the order determines the number of labels printed.
If you enter an order number that has already been rung up, "This order has already been rung up! Do you wish to ring it up again?" will be displayed. You can re-ring up an order.
If you enter an invalid order number, "Sorry, no such number on file" will be displayed.
If you enter an order number that has an item without a price, "Does not have a price." will be displayed. The order cannot be rung up.
If you enter an order number that has a non-inventory item that was not given a sales department, the item will not be rung up.