ARM - Accounts Receivable Maintenance
Add/Change/Delete Accounts
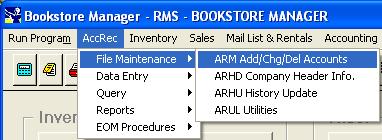
To open ARM, press <Alt M> ("Menu") and follow the Menu path illustrated below, then press <Enter>, or simply enter <ARM> in the "Enter Program Name" field and press <Enter>.
| Customer Profile Screen | Additional Information Screen | Add to Mail List | Change or Delete Account |
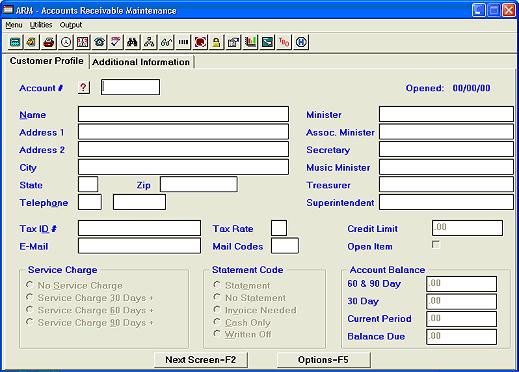
Add a new account by pressing <Enter>. The computer displays “XXXXXX” for the account number. After the account has been saved, the computer will assign the customer an account number in alphabetical order with other accounts already on file. <Esc> will allow you to exit the account entry without saving. <Esc> again will allow you to exit ARM.
Note: Account # 0000001 is setup to be an account for "new accounts" ONLY and it will not retain any credit or debit history on this account. It allows you to charge to Acct # 0000001 for customers that does not have an AR Account already setup. The employee charging to Acct # 0000001 needs to have the customer fill out some sort of form with name, address, telephone #, person's authorized to charge, or any other info you need to put into ARM. The charge info will show up on the SLAR report, you will need to get this and the form you wrote all the customers info on to your accounting person. They will then need to setup an official AR account for that customer and apply the debit of their initial charge to the new account.
The date the account is opened will be displayed after the information has been entered and saved.
Enter the customer's name. If this is an individual, enter the last name with a comma, then the first name. The comma will reverse the name when statements are printed.
Enter the customer's address. You may type in <C> or <city> on Address 2, and the name of your company's city will be inserted.
Enter the state and zip code. (Note: If you enter the zip code first, the city and state will automatically be entered.)
Enter the Telephone number.
Minister, Assoc. Minister, Secretary, Music Minister, Treasurer, Superintendent:
If this is a church account, enter the name of the Minister, Associate Minister, Secretary, Music Minister, Treasurer, and Superintendent.
Any of these titles may be changed as follows:
At Enter Program name, type in ENV. Hit AddEntry=F6 and type in one of the following. According to which title you are changing, enter the desired one as indicated below, then a space, and then the new title. Press <F5> and Save. Exit BSMGR and reopen to make effective.
1. PRES (Enter PRES to change the Minister field)
2. V-PRES (Enter V-PRES to change Assoc. Minister)
3. SECRETARY (Enter SECRETARY to change Secretary)
4. V-PRES2 (Enter V-PRES2 to change Music Minister)
5. TREASURER (Enter TREASURER to change Treasurer)
6. SUPERINTENDENT (Enter SUPERINTENDENT to change Superintendent)
Example: To change the Pastor field to read Minister, the Environment line should read: PRES MINISTER
Enter the tax ID number.
Enter E-Mail address.
Note: If a customer wishes to receive statements/invoices by e-mail, the E-mail address must be entered here and the “E-Mail Statement/Invoice” field must be selected on the Additional Information screen. Also, e-mail invoices require that the “Send Electronic Invoice” utility in the Schedule (“Scheduled Tasks”) program be checked.
Enter the tax type for this customer.
· 0 = Exempt from sales tax.
· 1 thru 4 = Taxable at the rate set up in SYS, Config File, Change Misc. Configurations, numbers 4047 thru 4050.
Enter mail codes that you have selected; such as, “I” for “Individual,” “C” for “Church,” “P” for “Pastor,” “O” for “Organization,” or “M” for “Music Teacher.” You may use up to three characters. This will allow you to print labels for specific customers.
The Credit Limit will default to the amount set up on the company maintenance header (“ARHD”), or you may override the default by entering a different amount here. When making entries in Accounts Receivable Entry (“ARE”) or entries to Accounts Receivable at POS, the credit limit will be displayed.
The default in this field is for the Balance Forward method of Accounts Receivable. However, if you will be using the Open Item method for this customer, you will need to click a check mark into this field.
Select one of the following for the service charge code.
· No Service Charge - No service charge will be added.
· Service Charge 30 Days + = Regular service charge will be added for all amounts past due 30 days.
· Service Charge 60 Days + =Regular service charge will be added on amounts over 60 days past due.
· Service Charge 90 Days + =Regular service charge will be added on amounts over 90 days past due.
Select a statement code for the customer.
· Statement = A statement will be printed
· No Statement = A statement will not be printed
· Invoice Needed = A statement will be printed, and invoices will be included in the statement. (Invoices must be printed separately using ARIP.)
· Cash Only = Cannot charge. At the Point of Sale, when you try to charge, a message will be displayed, “This customer cannot charge. AR/Statement Code is ‘C’ or ‘D’….”.
· Written Off = A statement will not be printed. The account has been written off, but the account is still on file. At the Point of Sale, when you try to charge, a Message will be displayed, “This customer cannot charge. AR/Statement Code is ‘C’ or ‘D’....”.
Balance Due - The current balance of the customer’s account will automatically be updated as charges, credits, adjustments, and payments are posted to the account. (The SLAR will have to be run to post the changes from the Point of Sale.) When you are making entries in ARE, the current balance information will be displayed on the screen.
Press <F2> for Additional Information Screen.

Other Bill to Address
Address 1, Address 2, City, and Zip:
Enter the address where the statement should be sent if different from the address of the account.
Enter the telephone number for the account.
Misc. Options
Enter a code in the AR60/90 Sort # field if you want the Accounts Receivable 60/90 Day report to sort in a specific order. This is a two-character field. The program that this will sort is AR60 = Past Due 60+ Days. This program prints in numerical order. If you choose to sort by some other order, you may put in letters or numbers for the sort on EACH account you want to sort differently. The report will list the accounts without a sort number first in numerical order, then will print the other accounts by the sort chosen for the account.
Example: If out-of-state accounts are sorted by the state abbreviation, all the in-state accounts will print first in numerical order, then the out-of-state accounts will print in alphabetical order by state.
Any information you would like to notate about this customer can be entered in this field (up to 19 characters).
Any information you would like to notate about this customer can be entered in this field (up to 4 characters).
Check this field if the customer prefers to receive their monthly statements/invoices by U.S. Mail.
Check this field if the customer prefers to receive their monthly statements/invoices by E-Mail.
Note: In order for invoices to be e-mailed, the “Send Electronic Invoice” utility in the Schedule (“Scheduled Tasks”) program must be checked.
Check this field if the customer would like to receive their monthly statements/invoices by both U.S. Mail and E-Mail.
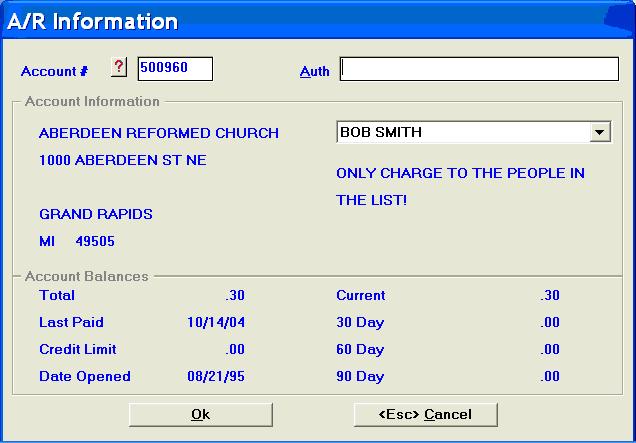
You may list up to 99 people who are authorized to charge to the account. These names will be displayed in a drop box on the A/R Information Screen when making charges to the account at Point of Sale.
(There are four blank fields.)
Enter any information that you want to display on the A/R Information screen when making charges to the account at Point of Sale.
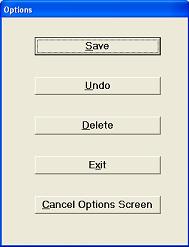
Press <F5> for “Options” and select Save to save the new customer account.
OPTIONS
After adding a new account, a window will appear which gives the option of having BSMGR automatically add the customer to the mailing list.
Yes = to add to the mail list.
No = to not add to the mail list.
Change or Delete a Customer Account
Change or Delete an account by entering the assigned account number, and the account information will be displayed. (If the account number is unknown, press <F3> for "A/R Lookup," choose the customer account needed, press <Enter>, then OK, and the information will be displayed.) Press <F5> for "Options" and choose Save to save the changes to the account, or choose Delete to delete the account. <Esc> will allow you to exit the account without saving or deleting. <Esc> again will allow you to exit ARM.
Options
If you select Delete, you will be asked, "Are you sure you want to delete?"
OK - will delete the account.
Cancel - will not delete the account.
Note: You cannot delete an account that is not clear. "Unable to delete, transaction on file." will be displayed. The balance forward must be zero, with no transactions for the current period.