Add/Change/Delete Items
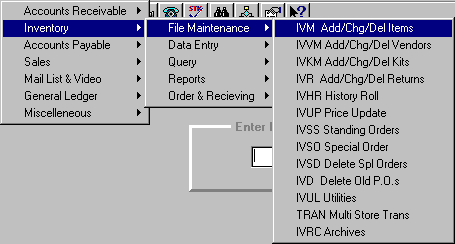
To open IVM, press <Alt M> ("Menu") and follow the Menu path illustrated below, then press <Enter>, or simply enter <IVM> in the "Enter Program Name" field and press <Enter>.

Note: To secure IVM from inadvertent deletion or changes in inventory quantities, you can set up a passcode in the PASS program. When this feature is active, without the passcode IVM can be accessed in a "read mode" only.
Add - Add new items to inventory.
Change/Delete - Change or Delete items on inventory.
Massive Changes - Massive stock changes by:
- Category then Author
- Category then Title
- By Title
- By Author
- Vendor Number One (By Title)
Massive Additions - Adds items on inventory by scanning and reading a database.
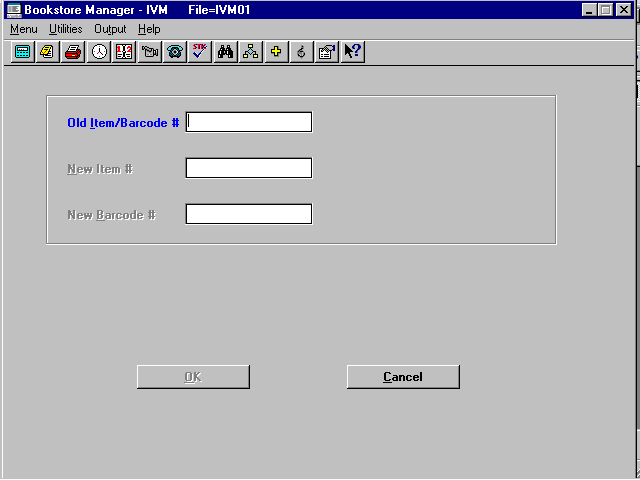
Change Item # - Change an inventory item number.
Build From a File - By portable reader.
IVM Screen 1 - General Information
Scan or enter an item number. If the number you enter is not found, a message, "No such item on file…", will be displayed. If the item number is found, the inventory masterfile Screen 1 for the item will be displayed.
Enter or arrow down to the field to be changed, and make the needed change. Press <F5> and select Save to save the change(s).
If the item is to be deleted, press <F5> and select Delete. A message, "Are you sure you want to delete?", will be displayed. Select OK to delete, and the cursor will return to the "Item" field for you to continue deleting items. When you have finished deleting items, press <F5> and select the "Exit Current Program" option, or simply press <Esc> twice to exit the program.
IVM Screen 1 - General Information
IVM Screen 2 -Additional Information
Select the "Listing" option for items to be changed:
By Category-(then Author) - Items will be displayed to the screen in alphabetical order by author within a category.
By Category-(then Title) - Items will be displayed in alphabetical order by title within a category.
By Title - Items will be displayed alphabetically by title.
By Author - Items will be displayed alphabetically by author, in numerical order.
By Vendor #1 (by Title) - Items will be displayed by specific vendor, by title.
After selecting one of the above options, enter the "Parameters" accordingly.
Vendor - Only items from the specified vendor entered will be reviewed. Leave the field blank to review all vendors.
Begin Category
End Category
Note: If you only want one category, enter the same category number in both category fields.
Beginning Author
Beginning Title
Note: Authors and Titles will be listed alphabetically. By entering a starting letter you may begin displaying items in that letter's alphabetical range of the file instead of the beginning.
Field to Change - Select the field you need to change from the list box. (You may type a letter to move in the list box to the alphabetical range you need.)
Select OK, and the inventory maintenance screen of the first item will be displayed with the cursor in the designated field.
Enter the change, select <F5> and Save, and the inventory maintenance screen of the next item will be displayed with the cursor in the designated field.
When the last item on the listing has been saved, you will be returned to the "Options" screen, where you may choose another option in inventory maintenance, or Exit the program.
Select a "Database to Use."
Work within one category at a time. Choose the category number for items you will be entering. Then enter the minimum/maximum levels you want to stock. The "On Hand" field will default to one (1).
Select OK to go to an inventory maintenance screen. Scan the item or enter the item number. The database will be scanned for the item number. If found, the following fields will be filled in:
Item, Barcode #, Desc, Auth/Artist, Vend1, 2, and 3, Pub/Mfg, Subject, Binding, Units Pkg, Cat #1, Minimum, Maximum, On Hand, Sugg. Retail, Our Price #1, Discount, and Wholesale.
The following fields default to "Y":
Taxable, Labels, Track, Analyze, and Returnable.
The "Max Line Disc" field defaults to "99," the "Months to Stock" field defaults to "01-12," and the "Grouping" field defaults to "Backlist."
If everything is OK, select <F5> to Save.
If an item that has already been added to inventory is entered, a message window will allow you to add to the on-hand count.
If an item is not found in the database, you are given a blank maintenance screen so the item can be entered manually.
When ready to enter items into another category, exit and re-enter the program so the items will default to the correct category.

Enter the "Old Item/Barcode #."
The title of the item will be displayed, and you will be prompted to enter the "New Item #" and the "New Barcode #." Select OK and the cursor will be returned to the "Old Item/Barcode #" field for you to continue changing item/barcode numbers.
The history of the item will be retained.
When you have finished making the changes, select Cancel, or simply press <Esc> twice to exit the program.
Refer to instructions for portable reader.
Database to Use
Select a "Database to Use."
Parameters
Choose the category number for the items to be entered, and the minimum/maximum amounts you want to stock.
Will show the amount of items found and the amount of items not found.
<Esc> to quit.