APM - ADD/CHANGE/DELETE VENDORS
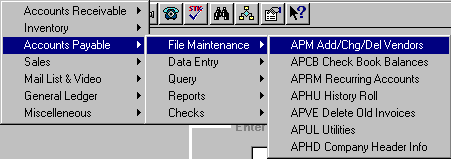
To open APM, press <Alt M> ("Menu") and follow the Menu path illustrated below, then press <Enter>, or simply enter <APM> in the "Enter Program Name" field and press <Enter>.

Add New Vendor
Enter the number you have assigned to vendor, or press <Enter> to move to the "Vendor Name" field. After the name has been entered, the computer will assign the customer a vendor number in the correct alphabetical order.
Enter the name of the vendor.
Enter the vendor’s physical address.
Zip Code
Enter the vendor's zip code.
Telephone
Enter the vendor's telephone number.
Enter the account number the vendor has given your company.
Leave blank, or, to put vendor on hold, enter "H" so that invoices will not be paid until "H" is taken off.
Select the discount that is allowed on invoices by this vendor. The discount will automatically be discounted on each invoice that is entered. (This discount will not be taken if the invoice is paid after the discount due date that is entered.)
Enter up to the first six letters of the vendor's name. You can enter four, five, or six letters or even initials, etc. Three letters work well, but you will have some vendors that all start with the same letters. These alpha codes can be used instead of the vendor number when reviewing information in Accounts Payable Maintenance (APM), Accounts Payable Inquiry (API) or Accounts Payable Entry (APE) routines.
Enter the General Ledger number for distribution of vendor amounts. All transactions for this vendor will automatically be credited or debited to this "GL#," unless it is changed. This number can be overridden when entering invoices or credit memos.
This amount will be automatically entered when invoices or credits are entered for the vendor.
The amount from "Vendor YTD $" will be moved to this field when the APHU ("History Update") program is run at the end of the year.
Enter the vendor's mailing address if different from physical address. Checks will be mailed to this address.
Select this option to Save the entries, Undo the entries, or to Exit the program without saving.
Change/Delete Vendor
Enter the vendor account number or press <F3> to lookup, and the maintenance screen will be displayed.
- Make the changes needed, and select Options=F5 to Save.
- Or, if you are deleting the vendor and there are unpaid invoices/credit memos on the vendor account, a message, "Sorry, this Vendor has unused invoices or credit memos.", will be displayed. If there is no balance to be paid, a message, "Are you sure you want to delete?", will be displayed, and selecting OK will delete the vendor.