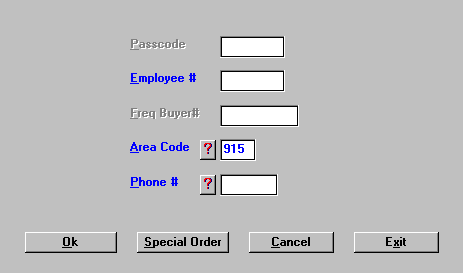
To open POS, press <Alt M> ("Menu") and follow the Menu path illustrated below, then press <Enter>, or simply enter <POS> in the "Enter Program Name" field and press <Enter>.

| POS Limitations | Opening POS Screen | Passcode & Employee # |
| Frequent Buyer Routine | Telephone-Mailing List | POS Transactions |
A Point of Sale Transaction is limited to:
200 line items 20 coupons 20 gift certificates 5 checks

1. Passcode and Employee Number
Each store assigns employee numbers and sets up employee passwords.
- Enter <EMP> at the "Enter Program Name" field, and then enter the supervisory password given by BSMGR. Select the "Add/Change/Delete" option and then enter the information requested, select F5-Options, and choose Save. Passwords can be deleted the same way, except under F5-Options, choose Delete.
- To activate the request for "Employee #" or "Passcode" at Point of Sale, set up SYS Config File, Change Misc. Configurations, number 4027, "Prompt for Employee #? Y/N/P."
Y Will activate the "Employee #" field. P Will activate the "Passcode" field instead of the "Employee #" field. N Select this if you do not wish to use these features.
- To cause the employee’s sales totals to print on the Z-tape, choose "Y" at SYS Config File, Change Misc. Configurations, number 4021, "Print Salesperson totals on Z-tape? Y/N."
- Also, in order for these totals to print on the Z-tape, the last two characters of the "Employee #" must be numbers (01-24) instead of letters. Initials may be used for employee numbers. However, if the last two characters are not numbers 01-24, the totals sold per employee will not be shown on the Z tape.
- The sales for any numbers other than 01-24 will appear as "Other" on the Z tape.
- If the "Passcode" field is not activated, the "Employee #" field defaults to the last number used. Therefore, the same employee may just press <Enter> to ring up another sale, without having to enter his employee number again.
- If a terminal is used exclusively by one employee, SYS, Config. File, Change Misc. Configurations, number 4026, "Ask Employee only once? Y/N," may be set to "Y," so that the "Passcode" and "Employee #" fields will be skipped after the first sale until POS is exited.
You may set-up a routine to give discounts to frequent buyers.
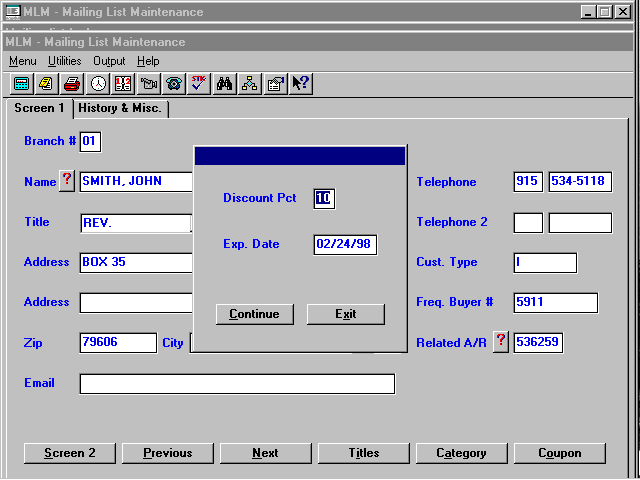
- The frequent buyer number is set up in MLM ("Mail List Maintenance") by entering a number of your choosing in the "Frequent Buyer #" field and designating a discount percentage and an expiration date for this customer.

- You will also need to set up SYS, Config File, Change Misc. Configurations, line 4039, "(F)req Buyer / (D)isc Rtn."
F Sets up the frequent buyer routine at the beginning of a transaction, allowing designated discount for each item sold. D Will deactivate the frequent buyer routine.
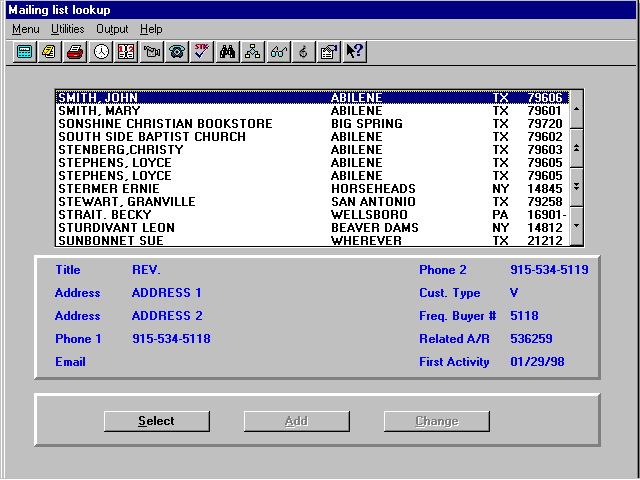
- When opening a Point of Sale transaction, enter the customer’s "Frequent Buyer #," and the discount designated at the time his number was set up will automatically be applied to all items purchased on the transaction. If the customer does not remember his frequent buyer number, enter his phone number to bring up Mailing List Lookup, which will show this information.
Example: Mailing List Lookup Shows Frequent Buyer #

- If the discount date has expired, a message, "Frequent Buyer Card has Expired." will be displayed. Select OK to proceed with the transaction with no discount, or go to MLM to reactivate the discount with a new expiration date, and then return to POS to begin the transaction again by re-entering the "Frequent Buyer #."
- The frequent buyer discount will not override a department or an item set up with a sale price. It will override a category discount.
3. Telephone - Mailing List
- If the phone number/customer is on your mailing list, the computer will locate and highlight the customer’s name. If this is the correct customer, press <Enter> and Select to proceed to the POS transaction screen.
- If the customer is not on your mailing list, MLM will be displayed. At this point, you may add the customer’s mailing information to MLM, or press <Esc> to proceed to the POS transaction screen.
- If the customer does not wish to give his phone number, select OK (or press <Alt O>) to proceed to the POS transaction screen without the sale being tied to a name.
- If the phone number is obtained before the sale, the "Customer Name" will be displayed at the top of the POS transaction screen during the sale.
- If the area code you need is not the default area code, enter the pertinent number.
Note: You may set SYS Config number 4004 to skip the area code field.
- Whether the phone number is obtained before or after the sale, a personalized message will automatically print on the sales ticket.
Example:
Thank you!
John Smith
Have a Great Day!