ARE - MANUAL ENTRY
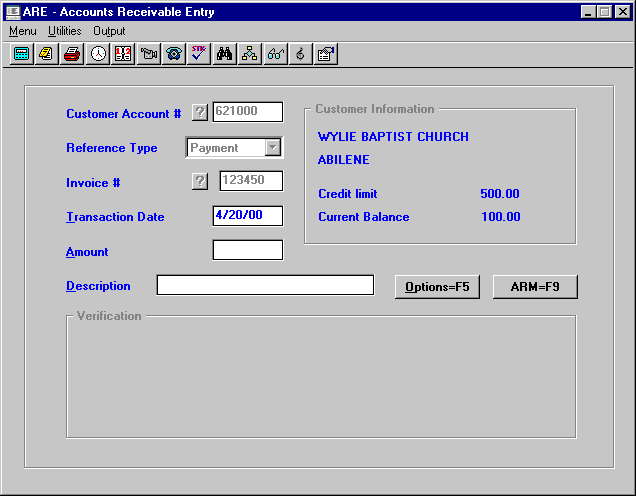
To open ARE, press <Alt M> ("Menu") and follow the Menu path illustrated below, then press <Enter>, or simply enter <ARE> in the "Enter Program Name" field and press <Enter>.

Enter Input Date:
Enter the desired date to apply the entries (default is the current date), then select OK.

Enter the customer account number, or press <F3> to find the account number in "AR Lookup."
The "Customer Information" will be displayed. (Name, City, Credit Limit, and Current Balance.)
Use arrows to locate the type of entry (will default to the previous "Type" entered) and then press <Enter>.
- Invoice: Allows entry of invoice. (Automatic debit in the amount.)
- Credit Memo: Allows entry of credit memo. (Automatic credit in the amount.)
- Payment: Allows entry of payment. (Automatic credit in the amount.)
- Adjustment: Allows entry of adjustment. (Automatic debit in the amount. Enter a minus to take a credit amount.)
- Discount: Allows entry of discount. (Automatic credit in the amount.)
Enter the invoice/credit memo/ payment/adjustment/discount number. Press <F3> for ARI ("Current Balance Inquiry"), if this number is unknown.
Enter the date of the invoice/credit memo/payment/adjustment/discount. (Pressing <Enter> will automatically enter the default date, which is the current date.)
Enter the invoice/credit memo/payment/adjustment/discount amount. (Do not use decimals.)
- The invoice and adjustment amounts are automatically entered as debits.
- The credit memo, payment, and discount amounts are automatically entered as credits.
Enter description (PO#, name, check number, etc.). This line will print on the statement. You can arrow up to change information entered up to the reference number. If you need to change the reference number, you will need to cancel the entry and re-enter.
Save Will accept and save the information as entered.
Undo Will cancel the entry.
"Are you sure you want to delete?", will be displayed.
- Choose OK and the entry will be deleted.
- Choose Cancel if you decide not to delete the entry.
Allows you to access Accounts Receivable Maintenance.
<Esc>
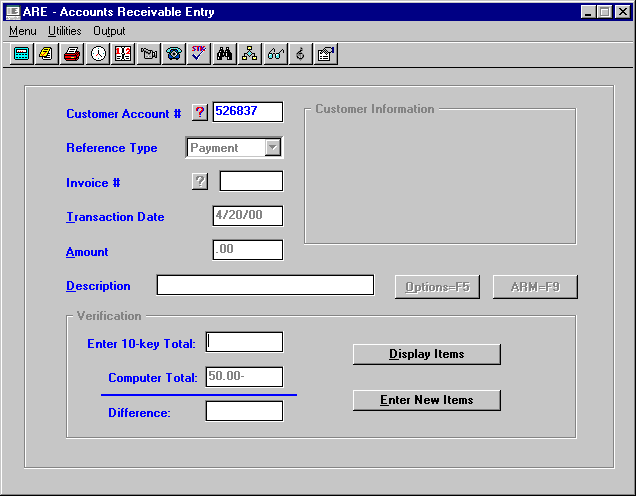
After completing all entries, press <Esc> to end the batch, and entry fields for "Verification" will appear.

Enter 10-key Total
Enter the batch total.
If the batch total entered does not balance with the Reference Amounts, the 10-key Total, Computer Total, and Difference will be shown, along with a message, "Out of Balance." Enter OK and choose one of the following:
- Display Items: Highlight an item and press <Enter>, then <Detail>, to make changes. After making changes, press <Esc> to go back to "Verification".
- Enter New Items: Enter new items or items left off. Then select "Options <F5>," Save and <Esc> to return to "Verification."
If the batch total entered balances with the Reference Amounts, a message, "You will now need the printer, check for ready and press <Enter>" will be displayed. The entries will be printed at this time.
Note: Credit memos, payments, and discounts are applied to the oldest outstanding invoices. Adjustments are applied to current invoices first.
Note: Payments applied to accounts that do not go through the cash register need to be rung up on the cash register as a batch total on Account 100001. This is a "DUMMY" account, as the payments have already been applied to the correct accounts. This also puts the amount on the General Ledger Accounts Receivable Trade Account when sales are sent to the general ledger. It also makes your deposit balance with your Z-tape.
Note: Entries made using the ARE program are not sent to the General Ledger unless they have been rung up at the Point of Sale. Also, service charges do not go to the General Ledger.