APE
OFFICE CHECK
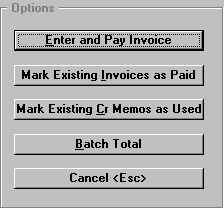
This option is for entering an invoice that has not previously been entered on the computer and for marking paid with an office check. You also have the option to print the check.
Enter the same as a regular Invoice entry; however, when you pass the "Status" field, the cursor will move to the "Check #" and the "Ck Date" fields. Enter the office check number and date. If a discount is taken, it will have to be entered manually. Make sure the net amount equals the amount paid on the check.
Options=F5
- Select Save to accept the information entered. A message, "Do you want to print the check?", will be displayed. Select "Yes" to print the check.
- Select Undo to cancel the entry.
- Select Cancel Options Screen to change information in the event you entered something incorrectly. You can change any field up to the "Invoice #" field. The invoice number and the vendor number cannot be changed. You will have to cancel and re-enter if either is wrong.
- End Batch - Choose "Batch Total." Enter the batch total, then you may enter other batches or exit the program. A report will print, showing the general ledger account numbers and debit and credit amounts that will be sent to the general ledger with the GLAP ("Accounts Payable Transfer") program. When you inquire on API, the invoice will show "paid," with the office check number and the date paid. DO NOT enter the office check manually to the general ledger. The entries will be made to the general ledger by invoice date when the GLAP program is run. The office check will print on the APCR ("Check Register"), with "Office" after the check number.
Mark Existing Invoices as Paid:
At the Invoice entry screen, enter the "Vendor No" or press <F3> to look up. Press <Enter>. The vendor name will display.
Enter the invoice number, and press <Enter>.
- The invoice will be displayed with a message, "Pay the entire Invoice?" This gives you the option to make a partial payment, with the balance being applied to a newly created invoice, as follows:
a. At the message window, select No.
b. The next window will have fields for entering the amount you wish to pay and for entering a number for an invoice you wish to create for the balance.
- Or, if the invoice is already marked as paid, a message, "This Invoice/Credit Memo has already been paid or used!", will be displayed.
When marking the invoice paid, enter the check number and the check date.
Options=F5
Select Options=F5 to accept the information. A message, "Remember, these entries must be made manually in the check book. Use the APCB programs to do so!", will be displayed. Select OK. G/L entries will be made when GLAP is run by check date.
Mark existing Cr. Memo as Used
At the Credit Memo entry screen, enter the "Vendor No" or press <F3> to look up. Press <Enter>. The vendor name will display.
Enter the "Credit Memo #" and press <Enter>.
- The credit memo will be displayed with a message, "Mark the entire cr memo used?" This gives you the option to use a partial amount of the credit memo, with the balance being applied to a newly created credit memo, as follows:
a. At the message window, select No.
b. The next window will have fields for entering the amount you wish to use (must be less than zero) and for entering a number for a credit memo you wish to create for the balance.
- Or, if the credit memo is already marked as used, a message, "This Invoice/Credit Memo has already been paid or used!", will be displayed.
When marking the credit memo used, enter the check number and the check date. G/L entries will be made by check date when GLAP is run.
Options=F5
Select Options=F5 to accept the information. A message, "Remember, these entries must be made manually in the check book. Use the APCB programs to do so!", will be displayed. Select OK. The batch total will be ZERO and there will NOT be a printout. This credit memo has already been expensed when entered on APE.