Using Point of Sale - POS
A Point of Sale Transaction is limited to:
- 200 line items
- 20 coupons
- 20 gift certificates
- 5 checks
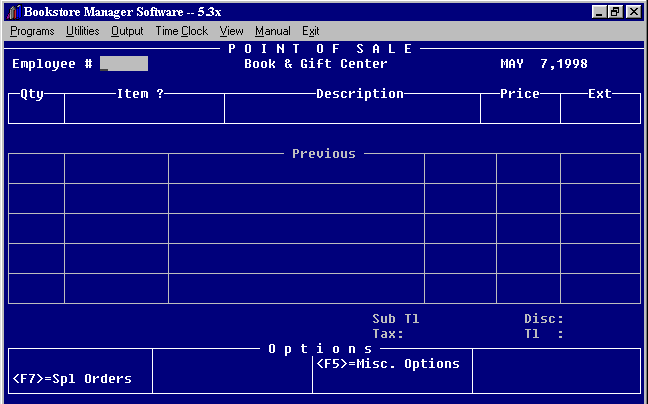
At a terminal designated to be a Point of Sale, type in POS at the Select Option prompt. This will take you into the Point of Sale routine. The menu bar will be displayed and may be used. The cursor will be at the employee field.
Put in the customer’s telephone number. This ties the sale to the customer’s name on the mailing list. The telephone number may be entered before or after the sale according to how it is set up in SYStem Config File, #5, Line 200 = Ask telephone number (B)efore or (A)fter Sale at POS? You may default an area code in the SYStem Config File, #5, Line 209 = Default Area Code on Mail List. Hold down the back space key to erase default area code and be able to enter another area code. Will bring up names on the mailing list that have the telephone number entered. Highlight name and press <Enter> to Confirm the right name. You may also press <F1> to modify/change information on mailing list name, or press <F2> to add name to mailing list. Press <Esc> to not tie the sale to a name.
Note: The departments on the P.O.S. have to be set up in the SYStem Config File, #3, in the Mail field to show a number 1-8. If a zero is entered for a department the sale will not be tied to a Mailing List and the window to enter the telephone number will not be brought up.
You may set-up the routine where you can give discounts to frequent buyers. The Frequent Buyer Information is set up in MLM Mail List Maintenance for the customer.
You will also need to go to System Config file, #5, Misc. configurations, line 502. This line looks like this:
502 = (F)req Buyer / (D)isc Rtn :
(F) means Frequent Buyer Discount Routine and will allow Item Discount;
(D) means Disable Frequent Buyer Routine but will allow Item Discount.
If you choose (F), it sets up the frequent buyer routine at the beginning of a transaction.
At the Point of Sale this routine is displayed before the sale transaction:
Frequent buyer
Enter Buyer # ? __
<Esc> to Skip
Enter the Frequent Buyer Number or press <F1> for look-up. Enter the telephone number for the customer. Mailing list names with that telephone number will be displayed. Highlight the correct name and press <Enter>. The Frequent Buyer Number and the customer’s name will be displayed and you must verify OK? with a "Y" or "N". "Y" will take the amount of the discount set up for the customer off of each item sold.
If the customer does not have a frequent buyer number set up or if the discount date has expired, ‘Card has expired’ will be displayed. Press any key to return to the Frequent Buyer Number. Press <Esc> to skip the Frequent Buyer or go back to the mail list and modify the mailing list customer information to set up a frequent buyer number.
The Frequent Buyer Discount will not override a department or an item set up with a sale price. It will overide a category discount.
Enter the employee number. Each store assigns employee numbers and a pass code may be set up for each employee if wanted. To do so, type EMP at a Select Option prompt, and enter the information. You must also set the SYStem Config File, #5, Line 214 = Print Salesperson totals on Z-tape? Y/N, and Line 307 = Prompt for Employee #? Y/N/P. "Y" on line 214 will print the salesperson totals if you use numbers for the last two characters. "P" on line 307 will prompt for a pass code at the employee #. The total sold for each employee will be shown on the Z tape. The employee numbers may be from 01 to 19. The sales for all other numbers will be on "Other" on the Z tape. Initials may be used but the total sold per employee will not be shown on the Z tape. The employee number defaults to the last number used, if you do not ask for pass code, so the same employee may press <Enter> to ring up another sale.
- The quantity sold will default to 1 (one) with the cursor in the item ? field. To change the quantity sold, press the arrow to the left key, enter the quantity and press <Enter>. To credit an item, enter a minus before the quantity.
- To change quantity after item is rung up, press the arrow down key and choose <F6>, a window will be displayed where you may change the units sold.
- The ? means Press <F1> for item look up. This will search the inventory masterfile by title, author, category, word, or ISBN (item) number. Highlight the one wanted and press <F1> to transfer, and item will be transferred to the sale transaction.
- At this field you may scan the item, enter the item number, or enter the price and press the department key or the Page Up key and all the departments will be displayed. Enter the number for the correct Sales Department. If you are selling more than one of an item, arrow to the left, enter the quantity, and press <Enter>, then scan the item, enter item number, or enter the price and press the Page Up key and enter correct Department number. Repeat the process for all items sold. Items sold with a dollar amount only will not be taken out of inventory. Items sold by scanning with barcode reader or by entering the item number will be taken out of inventory. From this field you may use any of the options displayed at the bottom of the screen. See Options at Bottom of Screen.
- You may check the price of an item by scanning/entering the item number, then at the price verify field, press <Esc> to not ring up the item.
- If renting a video, you may scan the barcode or enter: V space and four digit video number. If returning a video, press the department key for video rentals and enter the video # being returned. You may also set the due date for videos rented by pressing <F5>.
- If selling curriculum items, you may scan the barcode, enter the item #, or enter: C space and Catalog Number for the item. To ring up the complete standing order, type AUTO and choose option #2 = Standing Order, then put in the Standing Order #, and all items will be rung up.
- If ringing up an Order Entry order, type in OEPOS and put in the control number of the order entry and the items on the order will be rung up. Order Entry may also be rung up in the Order Entry program by pressing <F7> on work stations that are set up to be a Point of Sale.
- Type in AUTO and press <Enter>. Choose Option #1 = Consignment. A window will be displayed where you may enter the file number created in SLOC to ring up the items sold. Defaults to "1". - Choose Option #2 = Standing Order. A window is displayed where you may enter the Standing Order number. The items on the Standing Order will be rung up. All items on the Standing Order must in on inventory.
- The items rung up will display on the screen under "Previous". You may arrow down, highlight a previous item, and press <F5> to delete item from sale.
- The items rung up will display on the screen under "Previous". You may arrow down, highlight a previous item, and press <F6> to change quantity sold or a discount amount.
- If an item is scanned or the item number is entered and you have set the SYStem Config File, #5, line #311 to a "Y" or "R". The price will be shown and you may <Enter> to accept the price, or enter a new price and press <F4> to change. If the SYStem Config File, #5, line #311 is set to "Y", and the price is raised, item will be sold at the higher price and the price will be changed in inventory. If price is lowered, item will be sold at the lower price but the price will not be changed in inventory. If the SYStem Config File, #5, line #311 is set to "R", price may be changed up or down but original price will not be changed in inventory.
- If an item has a sale price and dates of the sale entered, the regular price will be displayed with an asterisk to the right. The item will be sold at the regular price then a discount amount taken off to reflect the sale price. The sales slip will show the item sold at regular price, then the discounted amount as a Sales Discount.
- You may check the price of an item by scanning/entering the item number, then at the price verify field, press <Esc> to not ring up the item.
- If you have set the SYStem Config File, #5, Line #311 to "N", the price will be filled in and the cursor will go to the Item ?______ field. The cursor will not stop in the Price field so price may be changed, or so you can press <Esc> to verify price and not ring up.
Press the "arrow up" key to Sub-Total the sale. If you want to add more items to the sale, press the "arrow up" key again or press the "Esc" key.
The sub-total screen looks like the following:
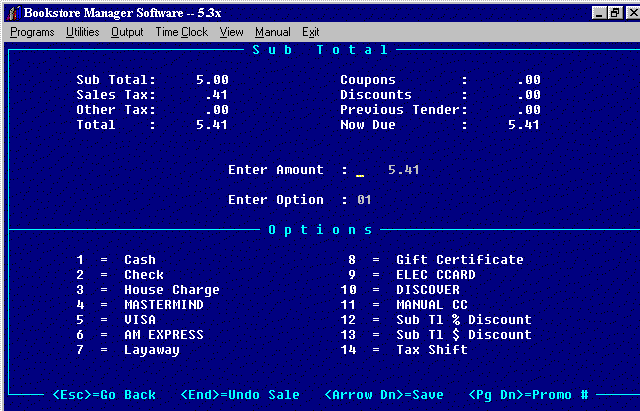
The Sub Total, Sales Tax, Other Tax (if any), Total, and Now Due will be filled in.
The cursor will be at the Enter Amount.
The Amount Due will be reflected. At this time, press:
<F1> for cash
<F2> for check
<F3> to charge to Accounts Receivable
<F4> <F5> <F6> <F9> <F10> etc.; or enter an amount and press <F1> for cash, <F2> for check, etc. Or you may ring up as follows:Press <Enter> to pay the total amount due, or enter an amount and press <Enter>, then choose one of the options shown.
- Option #1. To ring up a sale paid with cash. Note: The payment option will default to #01 Cash so you may just press <Enter> for a cash sale.
- Option #2. To ring up a sale paid with a check.
- Option #3. To ring up a sale to a House Charge. (Accounts Receivable)
- Options #4, #5, #6, #9, #10, or #11. To charge to a specific type of credit card. There are six Bank Card Options. At the Sub-Total, you may enter the amount being paid then choose the type of credit card being used.
- Option #7. To put items on layaway. Enter the amount to put on layaway, press <Enter> and choose Option #7. A window will be displayed to set up the layaway name, address, description, and telephone number.
- Option #8. To redeem a gift certificate. Enter the gift certificate number and the amount of the gift certificate will be taken off of the amount due. This will complete the sale if the gift certificate was for the same or for more than was due. The balance of the gift certificate will be printed on the transaction. If the gift certificate was for less than the amount due, the remaining due will be shown. The previous amount tendered will be shown at top of screen. You may finish the sale by accepting cash, check, etc.
- Option #12. To take a sub-total discount percentage, enter the percentage, press enter, choose option #12 and the discount amount will be shown at top of screen and the Now Due and Enter Amount will reflect the amount still owed. Finish the sale by accepting cash, check, etc. Total Saved with Discounts & Coupons will print on the sales transaction after "Change".
- Option #13. To take a sub-total discount dollar amount, enter the dollar amount of discount, press enter, choose option #13 and the discount amount will be shown at top of screen and the Now Due and Enter Amount will reflect the amount still owed. Finish the sale by accepting cash, check, etc. Total Saved with Discounts & Coupons will print on the sales transaction after "Change".
- Option #14. To change the tax rate, enter for the amount, choose option #14, press <Enter>, and choose the tax rate desired. The sales tax amount will be changed, and the Now Due and Enter Amount will reflect the new tax rate. Finish the sale by accepting cash, check, etc. If the sale is tax exempt, No Tax, a window will be displayed where you may enter the reason for the tax exemption if you have set your SYStem Config File line 216 Ask for additional sales tax exempt info at POS? to "Y". The choices are; 1= Exempt Organization, 2= For Resale, 3= Out of State, 4= Exempt Items. If you charge a sale to an Accounts Receivable Account that is set up to be tax exempt, at the end of the transaction the same window will be displayed. (To tax exempt a single item, press <F4> and then ring up the item.)
Options at Bottom of Point of Sale Screens
When the cursor is at the Employee # at the beginning of a sale, the following options may be used:
- <F7> = Special Orders. Pressing <F7> will go into the Special Orders program where you have the following options:
<F1> = Data Base Inquiry. Pressing <F1> will go into the Data Base Inquiry. You may choose which data base and what type of search you wish to use.
<F2> = Special Inquiry. Pressing <F2> will go into the Special Order Inquiry program. You may look up a Special Order by customer name, title, item number, or list to the screen items not on order.
<F3> = Inventory Inquiry. Pressing <F3> will go into the Inventory Inquiry program. You may search by title, author, category, word search, or ISBN number.
<F4> = Special Order. Pressing <F4> will go into the Special Order program where you may enter a Special Order for a customer.
- <F5> = Misc. Options. Press the <F5> key to go to Miscellaneous Options. The options are as follows:
<F2> = Delete Gift Cert or Layaway. Enter the control number for a gift certificate or a layaway. The amount to be refunded will be displayed. All Ok? Y/N. "Y" will delete the gift certificate or layaway entered. The amount to be refunded will be taken out of cash in the drawer. "N" will not delete the gift certificate or layaway. (To check on a gift certificate or layaway, go to the Menu Bar to Programs and choose Gift Cert. and Layaways.)
<F3> = Cash a Check. Enter the amount of check and press <Enter>. Verify if OK and enter the check number. This routine Displays the hot checks on file. This keeps your cash and checks correct on your Z tape
<F4> = Reprint Sales Slip tls. If you are using single copy paper at the Point of Sale, you will need to reprint the sales slip for credit card charges to keep a signed copy for the store.
<F5> = Paid Out. Enter paid out amount and press <Enter>. The paid out options will be displayed. Enter the number of the type of paid out and press <Enter>.
<F6> = Price Lookup. Brings up the price lookup file. This file is set up on your SYStem, Price Look Up File. You may edit the file to include items of your choice.
<F9> = Exit P.O.S. Exit Point of Sale? Y/N. "Y" will take you out of P.O.S. "N" will not exit P.O.S.
When the cursor is at the Item ? at the beginning of a sale, the above options and the following options may be used:
- <F4> = Tax Shift. Before ringing up an item, press <F4> to exempt No Tax or to change the Tax Rate on the item.
- <Pg Up> - No Item #. Enter a price, then press the <Page Up> key, so you may choose the department number to denote where to ring up the sale. All of the twenty-four cash register departments and the six miscellaneous departments will be shown. Enter the number of the correct department and press <Enter>.
- <F6> = Dept Tls. Press the <F6> key and you may see the amounts rung up in all twenty-four cash register departments for this sale.
- <Pg Dn> = Promo #. Press the <Page Down> key and you may enter the Promotional # for this sale. This will track the customers who have purchased items on this promotional number.
- Quit = Exit P.O.S. (Not on Screen) At the Item ?, type in Quit to exit out of the point of sale.
Options at the bottom of screen while in midst of a transaction are some of the same options as above and other options as follows:
- <Ar Dn> = Disc/Coup. After ringing up an item, enter an amount and press the <Arrow Down> key for a discount/coupon to be taken off the price of the item. The item will be rung up at the regular price, and If you enter an amount of 98 or less, that percentage of the price of the item will be taken off. If you enter 99, then 100 percent will be taken off the price of the item. If you enter 100 or more, than a dollar amount will be taken off the item price. A window will come up showing you the amount of the discount/coupon. Highlight the reason for the discount/coupon and press <Enter>.
- <Ar Dn> = Previous. Press the <Arrow Down> key and the cursor will go down to the Previous item rung up. You may <Arrow Up>, <Arrow Down>, <Page Up>, or <Page Down> to highlight item wanted. You may delete the item from the sale by pressing <F5>. Press <F6> to change units sold and discount dollar amount. <Esc> will take you back to the item ?.
- <Ar Up> = Sub Tl. Press the <Arrow Up> key (not the arrow up on the number pad) to sub total the transaction.
- <F5> = Price List. Press <F5> to go into the Price List file. This file is set up on your SYStem, Price Look Up File. You may edit the file to include items of your choice.
Options at Bottom of Sub-Total Screen:
- <Esc>=Go Back - Goes back to the Enter Item # or Amount field so you may enter other items.
- <End>=Undo Sale - Will take out all entries on the transaction. Inventory will be correct.
- <Arrow Dn>=Save - Saves the transaction so you may check someone else out and then go back and finish out the sale when ready. Will ask if you are sure you want to save the transaction. "Y" will save, "N" will not. "Invoice on Hold - <Arrow Dn> to Retrieve" will be displayed at the beginning of a sale until the invoice is retrieved. When invoice is retrieved, the items already rung up will be re-displayed and re-printed. You may continue to add items, close out the transaction, or undo the sale. You may have only one invoice per Point of Sale on hold.
- <Pg Dn> = Promo #. Press the <Page Down> key and you may enter the Promotional # for this sale. You may track customers who have purchased items tied to this promotional number.
Video Rental, Return, and Void
- Video Rental - At the Item ? field, scan the barcode label for the video or enter a ‘V space and the four digit Video Number’ to rent the video. You must enter all four digits of the video number. Enter the Membership Number or press <F5> for Mail List look-up, or <F6> for A/R#s. If looking up on the Mail List, enter the telephone number, if the number is found, the name will be highlighted and you may press <Enter> to rent the video to that customer. If the customer does not have a ‘V’ in the customer type, a warning will be displayed, "This Account does not have Video Privileges, Do you wish to override? Y/N." You may override and rent the video to the customer, but suggest you edit the customer’s file and put a ‘V’ in the customer type. The video title, member’s name, rental amount and the due date will be filled in. All OK? Y/N Enter "Y" and the video will be rented. Enter "N" and you may change the rental amount and/or due date. You may also find the video membership number from the Accounts Receivable Customers List. At the membership number field, press <F6> and enter the A/R name. Highlight the correct name and press <Enter>.
When you enter a membership number that has unpaid late charges on file, the information will be displayed to the screen and you may <Enter> to continue, <Esc> to Exit, or (C)lear Entries and collect the overdue charges.
To collect the overdue charges, enter ‘N’ for all OK. Arrow up to the Rental Amount and add the late charges.
When you try to rent a video that has been reserved, a warning will be displayed that the video has been reserved. It will show the member number and date reserved. "Do you still want to rent the video? Y/N." ‘Y’ will allow you to rent the video. ‘N’ will not rent the video.- Video Return - At the Item ? field, press the Department Key for Video Returns. Enter the Video Tape number being returned. If overdue, you may enter the overdue charges, and the overdue amount will be rung up to be paid. If overdue charges are not collected, you may choose to record the charges on the customer’s account so that the next time he tries to rent, you may collect the late charge. Enter a zero or Press <Enter> at the Overdue Charges, answer ‘Y’ to record the delinquent video on Members file record.
- Void of Video Rental - To void a Video Rental: Press the arrow to the left and enter a minus 1 in the quantity field, enter the video number and the membership number. The video rental window will be displayed. When asked if All OK?, put in "Y". This will check back in the video and keep the amount in the drawer correct.
- Change Due Date - To change the due date on video rentals, press the department key for Video Returns and then press <F5> to set the due date.
At the sub-total amount, you may save a transaction by pressing the arrow down key. "Invoice on Hold - <Arrow Down> to retrieve", will be displayed at the beginning of a sale. To recall the transaction, press the Arrow Down key. The items already rung up will be re-displayed and re-printed. You may continue to add items, close out the transaction, or undo the sale. You may have only one invoice per Point of Sale on hold.
At the Item ? field, type in VOID and press <Enter>. This will activate the void routine and items entered will be taken out of sales. This has to be done as a separate transaction, you cannot sell items on a void transaction.
To delete an item on a sale transaction, press the <Arrow Down> key. Highlight the item to be voided and press <F5>. The item will be deleted from the sale This must be done during a transaction and cannot be done at the sub-total. The inventory will be correct.
Layaway Sale, Layaway Payment, and Layaway Void
- Layaway Sale - Ring up the items to be put on layaway and subtotal transaction. Put the complete transaction on layaway, press <Enter>, then choose Option 7. A window will be displayed to set up the layaway name, address, description, and telephone number.
- Layaway Payment - Enter the amount being paid and press the Page Up key to display departments. Choose department #47= Pay on Layaway. Enter the Layaway Number or press <F1> to look up and highlight the correct number and press <Enter>. The layaway maintenance will be displayed so you may check and make sure the payment is applied to the correct layaway. Enter "Y" and the payment will be applied to the layaway and the balance will be printed on the transaction.
- Layaway Void - To void a layaway, void the sale and at the sub-total choose option #7. You will be asked if you are sure you wish to void the layaway Y/N?. "Y" will void the layaway sale and another window will tell you to go to Misc. Options <F2> = Delete Gift Certificate or Layaway. The <F5> key will bring up the Misc. Options. Press <F2>, and type in the control number of layaway to be voided and the name and amount to be refunded will be shown. The amount refunded will be taken out of cash.
Gift Certificate Sale / Redeem / Refund
- Gift Certificate Sale - Enter the amount of the Gift Certificate and press the Page Up Key. Choose #42 Gift Certificate. A window will be displayed where you may set up the gift certificate. Enter the name of the person to receive the gift certificate (last name first to make it easier to look up). The name of the person the gift certificate is to and the gift certificate number will be printed on the transaction.
- Gift Certificate Redeem - To redeem a gift certificate. At the sub-total, press <F8> or enter for the amount and choose #8 for gift certificate. Enter the gift certificate number and the gift certificate information will be displayed. The amount of the gift certificate will be taken off of the amount due. This will complete the sale if the gift certificate was for the same or for more than was due. If the gift certificate was for less than the amount due, the remaining due will be shown. You may finish the sale by accepting cash, check, etc.
- Gift Certificate Refund/Delete - To Refund a Gift Certificate Press <F5> for Miscellaneous Options. Choose <F2> = Delete Gift Certificate or Layaway. Type in the control number of the gift certificate and the amount to be refunded will be displayed. The amount refunded will be taken out of cash.
Item Discount is Arrow Down key
After ringing up an item, enter an amount and press the <Arrow Down> key for a discount/coupon to be taken off the price of the item. The item will be rung up at the regular price, and If you enter an amount of 98 or less, that percentage of the price of the item will be taken off. If you enter 99, then 100 percent will be taken off the price of the item. If you enter 100 or more, than a dollar amount will be taken off the item price. A window will come up showing you the amount of the discount/coupon. Highlight the reason for the discount/coupon and press <Enter>.
At the Sub Total amount, enter the amount of the discount, press <Enter> and choose Option #12 for Sub Total Percent Discount or Option #13 for Sub Total Dollar Discount. A window will come up showing you the amount of the discount/coupon. Highlight the reason for the discount/coupon and press <Enter>. The amount will be taken off of the sale and you may finish the sale by choosing the correct pay type. A discount percent may be up to 100% discount.
Entire Cash Register Department on Sale
You may put an entire Cash Register Department on Sale by entering a discount percent in the SYStem Config File #3 = Cash Register Config. Enter the store’s number, then choose the option that will change the correct Department. Tab over to the column that reads "Dis" and enter the number for the percent amount to discount. At the Point of Sale when an item in that Department is sold, the sales slip will show the item at the regular price and then show the discounted amount as a Promotion Discount.
You may put an entire Category on Sale by entering a discount percent in the SYStem Config File #2 = Change 199 Categories. Arrow down to the category, then arrow to the right until the cursor is right below the letters ‘Ds’ and enter the discount amount. (This should be on characters 21 & 22 of the line.) At the Point of Sale when an item in that Department is sold, the sales slip will show the item at the regular price and then will show the discounted amount as a Promotion Discount.
Items with Sale Price on Certain Dates
When items which have a Sale Price through certain dates are sold, the price shown will be the regular price with an asterisk. The item will be rung at the regular price with a discounted amount. The sales slip will show the regular price, then the discounted amount as a Sale Discount.
After an item is rung up with a discount amount, you may change the discount by pressing the arrow down key, highlight the item, and press <F6>. If the units sold is OK, press <Enter>, then enter the dollar discount amount for ONE item.
Enter the amount of the check and press <Page Up>=No item # to display all the departments on the Point of Sale. Choose #40 Returned Check. If you charge a fee for a Returned Check, enter the amount and press <Page Up>=No item # and choose #45 Misc. Revenue. Sub total the transaction and choose the type of payment.
When a customer pays down on merchandise ordered, (such as a down payment on robes or on a special order), enter the amount and press <Page Up>=No item # to display departments on point of sale. Choose #41Deposits. When the customer picks up the merchandise, ring up the purchase, then to take off the deposit amount, arrow to the left and put in a minus one, enter the amount of the deposit and press <Page Up>No item #. Choose #41 Deposits. This will take the deposit paid from the total due of the sale transaction.
Charge/Credit to A/R Account and Payment to A/R Account
- To charge to an A/R account, at the sub total, press <F3> or <Enter> for total amount and choose #3 House Charge. Enter the account number or press <F1> for Look Up. The A/R information will be displayed along with the Special Instructions and Account Balance information. Verify it is the correct account with "Y" and put in the Authorization Name. Enter a PO# here if it is needed. Whatever is typed on the Authorization Name will print on the statement. Press <Enter> and the charge will be completed. You cannot charge to an account that has been ‘written off’ or designated as ‘cash only’ by putting a ‘D’ or ‘C’ on the statement field in ARM. You should get the customer to sign the charge. Tear off ticket and press <Enter> to reprint the transaction or press <Esc> to skip.
- A credit to the account is entered in the void routine for a completed sale or arrow to the left and put in a minus amount before scanning, entering the item #, or entering an amount and pressing the department key. At the sub total choose #3 House Charge. Enter the account number etc. same as a charge. Tear off ticket and press <Enter> to reprint the transaction or press <Esc> to skip.
- A payment is made by entering the amount of the payment and pressing <Page Up>=No item #. Choose #46 Rec on Account. Enter the account number etc. same as a charge. At the Authorization Name put in the check number. Whatever is typed in the Authorization Name will appear on the statement to the customer.
Tax Exempt or Change Tax Rate Single Item is <F4> Key
To tax exempt or change the tax rate of an item at the Point of Sale, before ringing up the items, press the <F4>=Tax Shift key. A window will be displayed showing tax changes. Highlight ‘Exempt NO Tax’, press <Enter>, and then ring up the sale. The item will not be taxed. Highlight the correct tax rate (as set up in SYStem Configuration), press <Enter>, and then ring up the sale. The tax charged will be at the new rate. If the sale is Tax Exempt No Tax, a window will be displayed where you may enter the reason for the tax exemption if you have set your SYStem Config File line 216 = Ask for additional sales tax exempt info at POS? to "Y". The choices are; 1= Exempt Organization, 2= For Resale, 3= Out of State, 4= Exempt Items. If you charge a sale to an Accounts Receivable Account that is set up to be tax exempt, the tax will be taken off and the same window will be displayed.
Make a Special Order & Special Order Inquiry
- When the cursor is at the Employee field or the Enter Item or Amount field, press <F7> for Special Order Options. Choose <F4> to go into the Special Order program to enter a Special Order for a customer. See Inventory, VIII. Special Orders.
- When the cursor is at the Employee field or the Enter Item or Amount field, press <F7> to go to the Special Order Options. Choose <F2> to go into the Special Inquiry program. You may look up a Special Order by customer name, title, item number, or list to the screen items not on order.
At the sub-total press the <End> key and the entire transactions will be taken out. Inventory will be adjusted.
Sales on Consignment / Standing Orders
- To ring up a file created in the SLOC = Sales on Consignment program, at the Item ? field, type in AUTO and press <Enter>. A window will be displayed where you may choose #1 = Consignment, or #2 = Standing Order. Enter #1, then enter the file numbers created in SLOC to ring up a Consignment.
- To ring up a Standing Order created in IVSS, type in AUTO and press <Enter>. A window will be displayed where you may choose #1 = Consignment, or #2 = Standing Order. Enter #2, then enter the Standing Order # to ring up the Standing Order.
In Store Coupon(s) Automatically Issued at POS
When a sale is tied to a customer by the telephone number, the amount sold is remembered and added to the amount of purchase the next time the customer comes in. When the total purchases reaches the amount set to give a coupon, a coupon will be printed after sale is rung up. Customer earns Coupon may be displayed. On the Mailing List Maintenance for the customer, you may press <F9> to change amount toward the next coupon. Must enter Master Passcode, then enter the amount toward the next coupon. After changes are made you must (S)ave the changes.
You may scan Dayspring Cards at the Point of Sale without putting each individual card on inventory by doing the following:
In SYStem Config File, #5, Line 510 - Use Dayspring file for Prices: put a "Y".
Set up a Category for Cards in SYStem Config, #2 = Change 199 Categories.
Download from BSMGR’s Bulletin Board the file, DAYSPRIN, and put in the BOOK directory. (The filename does not have a "G")
Put an item on your inventory for each price of cards that will be sold. Example: If a card retails for $1.75, put an item on inventory with the item number "C175". Put Dayspring as the Vendor #1, and enter the category number for cards in the category field. You may leave the maximum/minimum and on hand at zero. Put in the price at $1.75. On the second screen, set the Analyze field to "N" so the item will not be analyzed/deleted with the history roll, and set the Multiples field to "Y". Do this for each different price of cards from Dayspring.
At the POS you may scan the card, if the barcode is not found in your inventory, the DAYSPRIN file will be read and if the barcode is found will tie the barcode to the item in your inventory with the same price.
Example: C175. The card will be sold showing the C175 as the item number and the department you have tied to the category number for cards. The selling price will be $1.75.
If a card is scanned that does not have an item set up for the price of the card, a message will be displayed:
Message
|
In the above example, you will need to add an item "C399" into your inventory for this item to scan properly.
This will keep the sales history for each price of Dayspring Cards.