ARM - ADD/CHANGE/DELETE CUSTOMER
ACCOUNTS RECEIVABLE MAINTENANCE O p t i o n s <1> = ADD <2> = CHANGE <3> = DELETE ENTER RUN-__ <Esc to Exit> |
1 - Allows addition of customers to A/R masterfile.
2 - Allows changes to customers in A/R masterfile.
3 - Allows deletion of customers from A/R masterfile.
<Esc> - Exits the program
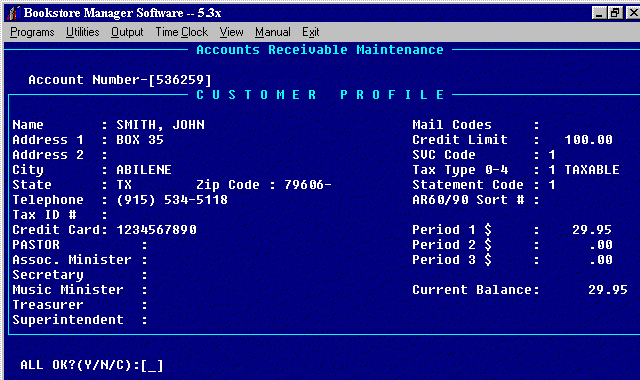
Enter the assigned account number, or by pressing <Enter> the computer displays "XXXXXX" for the account number. After the name has been entered, the computer will then assign the customer an account number in alphabetical order with other accounts already on file. <Esc> will allow you to exit the program. <F1> will go to a look up file. Note: When assigning numbers for Accounts Receivable, start numbers at "000003" or above.
Enter the customer's name. If an individual, enter the last name with a comma, then the first name. The comma will flip the name when statements are printed.
Enter the customer's address. You may type in C on Address 2 or City and the name of your company's city will be inserted.
Enter the state and zip code.
Enter the Telephone number.
Enter the tax ID number.
Enter credit card number.
Minister, Assoc. Minister, Secretary, Music Minister, Treasurer, Superintendent:
If this is a church account, enter the name of the Minister, Associate Minister, Secretary, Music Minister, Treasurer, and Superintendent. These titles may be changed.
If you want to change the title of any of the above:
Go to SYStem Environment and press <Insert> for a blank line. According to which title you are changing, enter the correct one as per below, then a space, then the new title. <Esc> and (S)ave. Go out of BSMGR and back in the make effective.
1. PRES (Enter PRES to change Minister)
2. V-PRES (Enter V-PRES to change Assoc. Minister)
3. SECRETARY (Enter SECRETARY to change Secretary)
4. V-PRES2 (Enter V-PRES2 to change Music Minister)
5. TREASURER (Enter TREASURER to change Treasurer)
6. SUPERINTENDENT (Enter SUPERINTENDENT to change Superintendent)
Example: To change Minister to read Pastor enter this line in the Environment.
PRES Pastor
Enter Mail Codes that you have selected. There are three characters you may use. This will allow you to print labels for specific customers.
The Credit limit will default to the amount set up on the company maintenance, or you may overwrite. When making entries in ARE, Accounts Receivable Entry, the credit limit will be displayed.
Enter one of the following for the Service code.
0 = No service charge will be added.
1 = Regular service charges will be added for all amounts past due 30 days.
2 = Regular service charges will be added for amounts past due 30 days; any merchandise that received specialdiscount will lose the discount and be charged full price.
3 = Regular service charges will be added on amounts over 60 days past due.
4 = Regular service charges will be added on amounts over 90 days past due.Enter the tax type for this customer.
0 = Exempt from sales tax.
1 thru 4 = Taxable the rate set up in System Config, #5, Lines 712 thru 715.
Enter the Statement Code for this customer.
SPACE = A statement will be printed if left blank.
N = Statement will not be printed.
I = Statement will be printed and invoices to be included in the statement. (Invoices must be printed separately using ARIP.)
C = Statement will be printed.
You cannot charge to a customer who has a "C" on the statement code. At the Point of Sale, when you try to charge a Message will be displayed, "This customer cannot charge. AR/Statement Code is ‘C’ or ‘D’...."
D = Statement will not be printed.
The account has been written off, but the account is still on file. At the Point of Sale, when you try to charge a Message will be displayed, "This customer cannot charge. AR/Statement Code is ‘C’ or ‘D’...."Enter a code in the AR60/90 Sort # if you want to sort the Accounts Receivable 60/90 day report to sort in a specific order. This is a two character field. The program that this will sort is AR60 = Past Due 60+ Days. This program prints in numerical order. If you choose to sort by some other order, you may put in letters or numbers for the sort on EACH account you want to sort differently. The report will list the accounts without a sort number first in numerical order, then will print the other accounts by the sort chosen for the account. Example: If out of state accounts are sorted by the state abbreviation, all the in state accounts will print first in numerical order, then the out of state accounts will print in alphabetical order by state.
Period 1 $, Period 2 $, Period 3 $:
Period 1 $, 2 $, and 3 $ - Indicates the total dollar amount of purchases for current period 1, period 2, and oldest Period 3. Whenever ‘ARHU’ is run, the totals are automatically updated. These periods are used when you are printing labels for A/R customers and limiting the labels to customers who have purchased a certain dollar amount. These periods may also be aged by running ‘ARHU’ #1 = Age History Balances. You may choose to run this program monthly, quarterly, every six months, or yearly.
Current Balance - The current balance of this customer’s account will automatically be updated as charges, credits, adjustments, and payments are posted to the account. (The SLAR will have to be run to post the changes from the Point of Sale.) When you are making entries in ARE, Accounts Receivable Entry, the current balance will be displayed on the screen.
"Y" accepts the information
"N" allows you to go back and change information
"C" will cancel the entry. You will be asked if you are sure you want to cancel.
Change Special Instructions and Bill to Information:
After entering "Y" to accept the entries to the account, you are asked if you want to Change Special Instructions and Bill to information? Y/N [_] Answering "Y" will bring up the following screen:
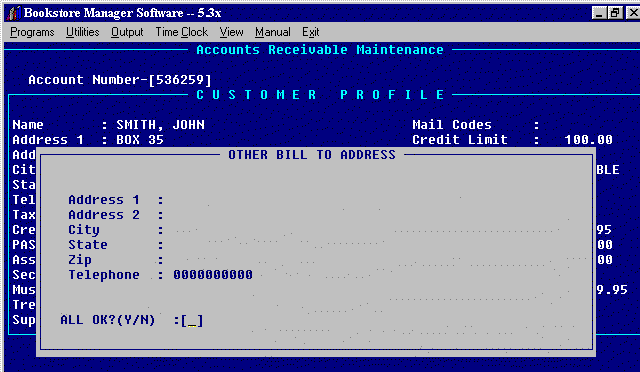
Address 1, Address 2, City, and Zip:
Enter the address where the statement will be sent if different from the address of the account.
Telephone:
Enter the telephone number for the account.
All OK? (Y/N) :
"Y" will accept the information.
"N" allows you to change information entered.
After entering "Y" to accept the information entered, the special instructions screen comes up.
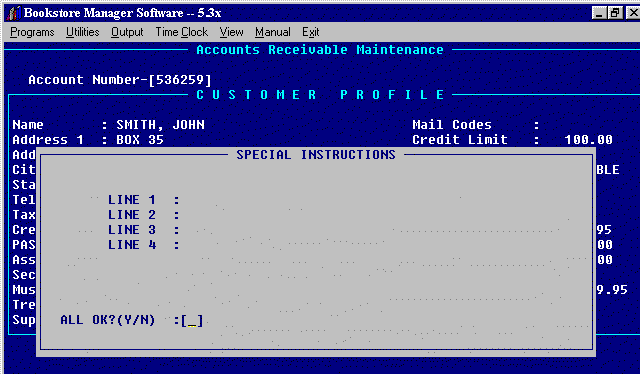
Line1, Line 2, Line 3, and Line 4:
Enter any information that you want to display to the screen when you make charges to the account at the Point of Sale.
All OK? (Y/N) :
"Y" will accept the information.
"N" allows you to change information entered.Add to Mail List:
After adding a new account a window will appear giving you the option of having Bookstore Manager automatically add the account to the mailing list.
"Y" will add name to the Mail List.
"N" will not add list to Mail List.
Enter the Account Number and press <Enter>. <Esc> will exit the program, or Press <F1> for Account Look Up. Enter the name of the account to bring up a list. Highlight the correct one, press <Enter>.) The information on file will be displayed.
Arrow up to the field you need to change, change the information and press <Enter>. (You MUST press <Enter> to retain the new information) <Esc> for Options
All OK?(Y/N/C):[_]
"N" Will give the option to change information
"C" Will cancel the changes made
"Y" Will accept the informationYou are then given the opportunity to change the Special Instructions and Bill to Information.
Enter the Account Number and press <Enter>. Or, Press <F1> for Account Look Up. Enter the name of the account to bring up a list. Highlight the correct one, press <Enter>. The information on file will be displayed. You will be asked, "Are you sure?". "Y" Will delete the account. "N" will not delete the account.
Note: You CANNOT delete an account with a balance on file. The account must be zero with no activity for the month. If activity is on account for the month, will have to wait until A/R close-out has been completed, then you may delete.