APE - INVOICE ENTRY
ACCOUNTS PAYABLE - DATA ENTRY MENU O p t i o n s
<Esc> to Exit |
1 - Allows entry of invoices and credit memos for permanent and temporary vendors to be paid by computer checks.
2 - "I"-Allows entry and payment of invoices that have NOT been previously entered on the computer and have been paid by an office check. These will be expensed and entered into the General Ledger. Do not manually enter into the General Ledger again from check stub.
"P"-Mark existing invoices as Paid. The invoices have already been entered on the computer and expensed, so code check stub to Accounts Payable Trade 00-3101.
3 - Voids computer checks that have been entered on the computer. Audit trail printed and G/L entry offset. Invoices and credit memos that were paid on the check will be ready to be pulled again for payment.
4 - Deletes an unpaid invoice, showing no further record in API. Audit trail printed and G/L entry offset.
5 - Deletes an unused credit memo. Audit trail printed and G/L entry offset.
<Esc> - Exits the program.
|
Enter "I" to enter invoices. Press <Enter>.
Enter "C" to enter credit memos. Press <Enter>.
Press <Esc> for Batch total.
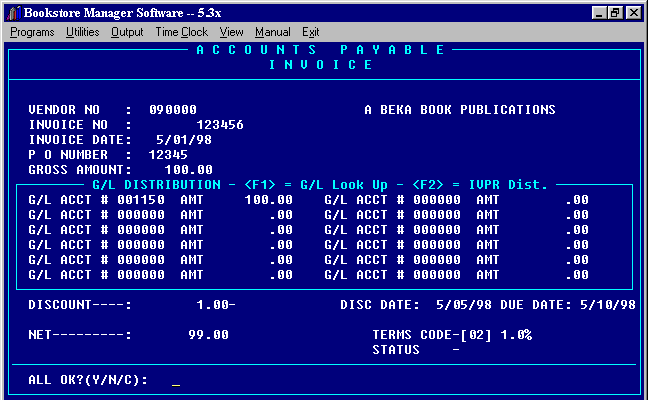
If you enter "I" for Invoice you will get the following screen:

VENDOR NUMBER
Enter the assigned number of the vendor or the Alpha Index code you gave the vendor and press <Enter>. Or, enter a few letters of the vendor name, press <Enter>, or, press "F1" for A/P Look Up file. A window will appear and you can type in the first few letters of the vendor, press <Enter>. Highlight the correct account, press <Enter> and the vendor # will be transferred to the vendor # space. The name of the vendor will be displayed. If you put in a wrong # you can press <Esc> and cancel the entry. Enter "F2" and you can set up a new vendor or change address, etc. Press "F3" and you can run the IVPR program to merge the purchase order for the invoice into inventory. After merging purchase order, press <Esc> back to the APE program. If the purchase order is merged at the vendor number field, the invoice #, invoice date, and PO number defaults. (Most stores merge the purchase orders immediately after checking in the product and do not wait until the invoice is entered to be paid.)INVOICE NUMBER
Enter the invoice # up to twelve characters. You can not enter the same invoice # twice. If you enter an invoice # which is already on file and has been paid, "DUPLICATE ITEM - **PAID**" will be shown at the bottom of screen. If not paid, you will be given the following options: Change Due Date or Change Status. We suggest you be consistent in the way you enter invoice numbers, whether to use hyphens etc. This makes it easier to find the invoices in API and also prevents entering the invoice twice, once with the hyphen and again without the hyphen.INVOICE DATE
Enter the date of the invoice.P O NUMBER
Enter the purchase order number. You do not have to enter this number. If the purchase order is entered here, at the gross amount field, you may press <F1> for PO look up and the PO number will be transferred.GROSS AMOUNT
Enter the total amount to be paid. If an invoice has 30-60-90 day billing you will need to pay with three invoices using A, B, C, at the beginning or ending of the invoice #, and entering one third of the gross amount to be paid each time. You may press <F1> to bring up a screen that allows you to view a list of items on a purchase order and see if they have been merged. If the PO number is entered in PO number field, the number will be transferred, press <Enter>. If not, enter the PO number, press <Enter> and the list of items on the purchase order will be listed. An asterisk will be to the right of items that have been merged. Press <Esc> to close window.DISTRIBUTION CODE
When vendors are added in Accounts Payable Maintenance, a default general ledger number is requested. The default general ledger number for that vendor will be inserted in this field. You may overwrite the default number. If you do not know the G/L account number, enter "F1" for G/L Look Up. Enter the account name and a list of accounts will be displayed. The type of account, (A) asset, (L) liability, (E) expense, (C) capitol, or (I) income will be shown to the right. Highlight the correct account, press <Enter> and the number will be transferred to the distribution field. The gross amount will default as the amount. If the amount is overwritten, and does not equal the gross amount, the next distribution will automatically default to the freight account number that is set up in A/P company maintenance. If you assign part of the gross to the freight account, the discount taken will not include the freight amount. You may distribute the amount of the invoice to as many accounts as needed. If the purchase order was merged at the vendor account number at the top of the entry; when you get to the G/L distribution you may press <F2> and get a break-out of what was bought on the invoice.DISCOUNT
There are four ways you may take a discount amount.- Set up the discount percent on vendor maintenance and the discount will be automatically figured.
- Enter the actual dollar amount to be discounted.
- Enter a percentage of the invoice amount. If you want a percentage, press <Enter> in the first space. When you enter the percentage amount do not place a decimal in the number. Example: 10%= 1000 1%= 100 1.5%= 150 15%= 1500
- Change the terms code on the invoice.
The discount will be computed on all distribution except the amount for freight.
DISCOUNT DUE DATE
Enter the date to be paid to receive the discount. Pressing the arrow down key will default date to the last entry made. If the invoice is pulled to be paid after the date to receive the discount, the discount will not be taken. The full amount of the invoice will be paid.DUE DATE
You may enter the date due for an invoice or you may press <Enter> and the date 30 days from the invoice date will be entered. Press <Enter> for due date of a credit memo puts the same date as the credit memo date so the credit may be taken as soon as possible.NET
The net amount that will be paid on the invoice will be automatically calculated.TERMS CODE
Terms code allows a discount to be automatically taken from each invoice. You may enter a permanent terms code in Accounts Payable Maintenance under each vendor. If you enter one of the following numbers, the percentage will automatically be figured for all distribution except the freight amount.01 = .5% 02 = 1.0% 03 = 1.5% 04 = 2.0% 05 = 2.5% 06 = 3.0%
To take off a discount amount, arrow to the terms code field and enter zeros and the discount will be removed.
STATUS
Blank - will allow invoice to be paid. Enter "H" - The invoice will be placed on hold and will not be paid until the "H" is removed.ALL OK? (Y/N/C):
- "Y" will accept the information entered.
- "N" will allow you to change information. If you entered something incorrectly, you may arrow up and change any field up to the invoice #. The invoice # and the vendor may not be changed. You will have to cancel and re-enter if either are wrong.
- "C" will cancel the entry.
<Esc> =END BATCH
You may switch from invoices to credits in one batch by pressing <Esc> or typing "END" in the vendor # space and choosing "C" for credit memo, etc. After all invoices and credits have been entered, press <Esc> or type in "END" and press <Esc> again for batch total entry. Put in the total of the invoices minus the credits. If the batch total is correct, you will exit back to the A/P Data Entry Menu, and you may enter another batch, etc. If you are out of balance, the accumulated amount and the difference will be displayed. It will ask you if the batch total is correct, if you enter "N" you can re-enter the batch total. If you enter "Y", the items you entered will be shown to the screen. You can arrow up and down to choose the one with the error and bring it back to the screen to change or cancel. You may also add other invoices/credits. When the batch total is correct, you will exit to A/P Data Entry Menu to put in more batches or exit the program. When you exit the program, you will be told that you need the printer and to check to see if printer is ready. When you press <Enter> the data you entered will be printed on the Accounts Payable Input Audit Register.
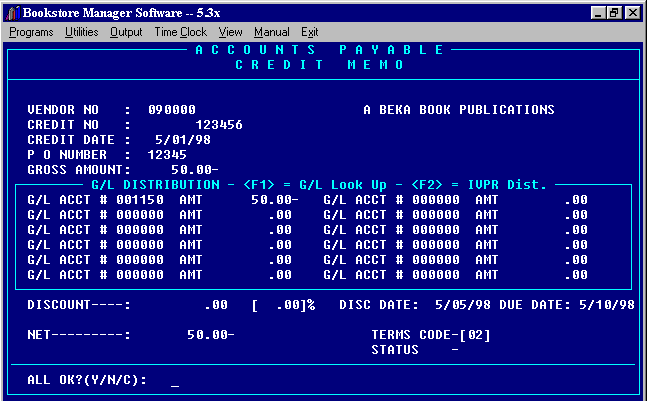
If you enter "C" for Credit Memo you will get the following screen:

CREDIT MEMOS work the same way as invoices, except the due date defaults to the same date as the credit memo date.
When <Esc> is pressed for Batch Total Entry the following screen is displayed:
|
Enter the total of all invoices and credits entered. If you are out of balance, it will tell you and also tell you the accumulated amount and difference. It will ask "IS BATCH TOTAL CORRECT? (Y/N): If you entered the total wrong, press "N" and change total. Press "Y" for a list of all invoices and credits entered. The page down key allows you to search through items. If an error is found, you can highlight the entry, press <Enter> and bring it to the screen and correct the error, or you can cancel the entry and the item will be deleted. You may also enter any invoice or credit memo left off by pressing (A)dd. <Esc> will bring you back to the batch total entry. When your batch total balances with what you entered, you will return to the "APE" menu. You may enter another batch, etc. When you <Esc> to Exit the Program, you will get the following message:
END
OF RUN ACCOUNTS PAYABLE INPUT |
An Accounts Payable Input Audit Register will be printed listing: Vendor # and name, invoice or credit memo #, invoice date, amount, P.O.#, G/L Distribution account number and name, and due date. The batch total will be printed at the bottom. Will also show the general ledger account number for accounts payable trade and the amount that will be credited to the account when the entries are sent to the general ledger.
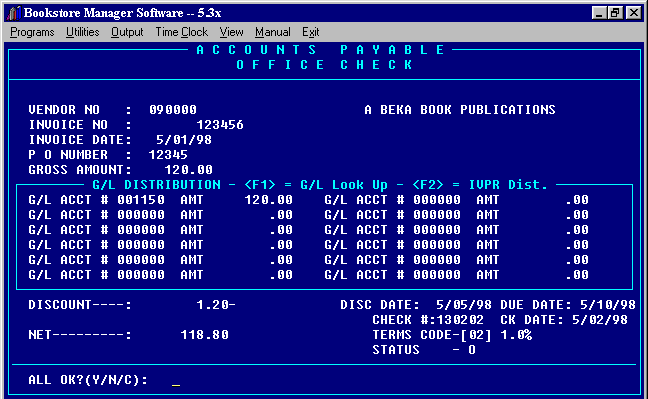
OFFICE CHECK
|
"I" = Enter and pay new invoice. (New invoice is an invoice that has not previously been entered on the computer.)

Enter the same as a regular invoice entry. When you pass the due date, it will ask for a CHECK # and CK DATE. Enter the office check # and date. Make sure the net amount equals the amount paid on the check.
All OK: (Y/N/C): __
- "Y" will accept information entered.
- "N" allows you to change information up to the invoice number.
- "C" cancels the entry.
After you press "Y", you may enter other invoices, etc., then you will need to choose "B" for batch total. Enter the batch total, then you may enter other batches or <Esc> and print the entries showing the general ledger account numbers and debit and credit amounts that will be sent to the general ledger with the GLAP program. When you check on "API" the invoice will show paid with the office check number and the date paid.
DO NOT enter the office check manually to the general ledger. The entries will be made when the GLAP program is run."P" = Mark existing invoices as Paid
Enter
Vendor No: 804000 SPRING ARBOR DISTRIBUTORS Enter Date Paid:
5/02/97
|
M E S S A G E Remember,
These entries must be made |
Enter the vendor number or press <F1> for A/P Look Up. Press <Enter>. The vendor name will display.
Enter the invoice number. Press <Enter>. The amount of the invoice will be shown. Make sure the amount paid is equal to what is shown. If the invoice is already marked as paid, a message will be displayed saying the invoice has been paid and will tell the check number.
Enter the date paid. Press <Enter>.
Enter the check number. Press <Enter>.
All OK? Y/N __
"Y" will accept information. Cursor will go back up to the invoice field where you may enter another invoice for the same vendor. If no more need to be entered, press <Esc> to go back to the vendor number field.
"N" will allow you to change the date paid and check number.
<Esc>, <Esc>, <Esc> will go back to the office check options and cancel the entry.
After choosing "Y" and going back to the office check options, choose "B" for batch total and press <Enter>. There will be no batch total because you have not made any entries, just noted as paid the entries already made.
MESSAGE - The entries will have to entered manually on the General Ledger using GLE. Enter as a debit to Accounts Payable Trade and a credit to the Checking Account. If you are using the APCB Check Book Balance (Reconciliation) program, the entries will have to be manually entered.
"C" = Mark existing Cr. Memo as Paid
Enter
Vendor No: 804000 SPRING ARBOR DISTRIBUTORS Enter Date Paid:
5/02/97
|
M E S S A G E
Remember, These entries must be made
manually in the G/L and Check Book.
Use the GLE and APCB programs to do so!The following instructions apply to Marking existing Invoices or Credit Memos as paid:
Enter the vendor #, invoice/credit memo number, date, and check number. When you say "ALL OK YES", the screen will go back to "Enter Invoice/Credit Memo Number" and you may enter as many invoices/credit memos that you are paying with the check. <Esc> takes you back to "Enter Vendor Number" and invoices/credit memos to another vendor may be marked as paid. This will mark the invoice/credit memo paid and show the check # and date on "API". The batch total will be ZERO and there will NOT be a print out. This invoice has already been expensed when entered on "APE". The check will not be on the A/P Check Register.
MESSAGE - The entries will have to entered manually on the General Ledger using GLE. Enter as a debit to Accounts Payable Trade and a credit to the Checking Account. If you are using the APCB Check Book Balance (Reconciliation) program, the entries will have to be manually entered.
V O I D C H E C K
PRESS <ENTER> FOR NEXT ENTRY
|
Enter the vendor #, check number, and net amount of check. If not found you can try again. It will show the check number voided and you may void another check or Exit. You will need to put in a batch total and you will get a print out on voided checks. The invoices and credit memos paid/taken on this check will return to an unpaid/untaken status and may be paid at a later time. If the invoice/credit memo was entered in error, delete the entry using option 4 or 5. You may delete an office check where you entered a "new" invoice. It will leave the invoice on the vendor as an unpaid invoice. The G/L distribution will be left as was, the checking account and discounts earned will be adjusted and the amount to be paid will be credited to Accounts Payable Trade.
APE #4 = DELETE AN UNPAID INVOICE
The following screen appears:
Delete An Unpaid Invoice Enter Vendor #: 777000 Sound Choice Accompaniment Tapes Enter Inv.# : 051694 ALL OK? Y/N: Y Results Successful - A/P invoice deleted and G/L entry offset |
Enter the vendor number and invoice number. ‘Results Successful - A/P invoice deleted and G/L entry offset’ will be displayed. An audit trail will be printed.
APE #5 = DELETE AN UNUSED CR/MEMO
A screen like the one to delete an unpaid invoice will be displayed. Enter the Vendor #, Credit Memo #, and All OK? "Y". If deleted, ‘Results Successful - A/P credit memo deleted and G/L entry offset’, will be shown.
Audit trail will print.