APM - CO. MAINTENANCE
ACCOUNTS PAYABLE MAINTENANCE O p t i o n s
|
1 - Allows new company and new vendors to be added.
2 - Allows information to be changed on company and vendors.
3 - Allows company and vendors to be deleted.
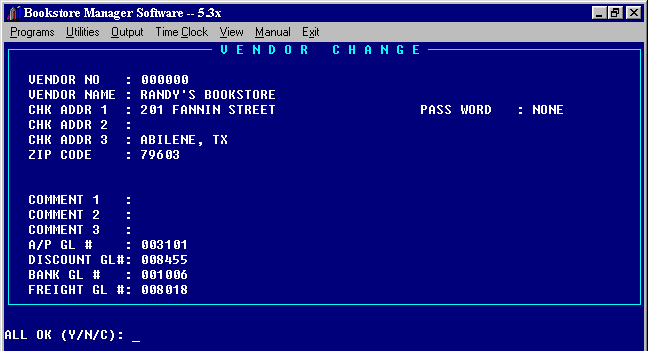
APM #1 = ADD (NEW COMPANY - Your Store)
VENDOR NO: Put in zeros to set up company.
VENDOR NAME: Put in the name of your company.
CHK ADDR 1, 2, 3: Put in the address of your company.
ZIP CODE: Put in your zip code.
COMMENT 1, 2, 3: Enter any comments you might wish.
APY GL#: Enter the general ledger number for Accounts Payable Trade here.
DISCOUNT GL#: Enter the general ledger number for Discounts Earned.
BANK 01 GL#: Enter the general ledger number for the Bank Account on which Accounts Payable checks are written.
FREIGHT GL#: Enter the general ledger number for Freight Expense. Any amount that is disbursed to this number will not be allowed a discount in Accounts Payable Entry.
PASSWORD: Enter the password you will need to get into Accounts Payable Maintenance, APM; Entry, APE; Inquiry, API; and when invoices are pulled to be paid, APDD or APBI. The (2) systems passcodes will work in A/P as well as the one entered here. Please note that you should not leave this entry blank unless you want blank to be accepted as the password. If password is "NONE", no password will be used in Accounts Payable programs.
APM #1 = ADD (NEW VENDOR)
VENDOR NO: Enter the assigned vendor #, or by pressing "enter" the computer displays "XXXXXX" for the Account Number. After the name has been entered, the computer will assign the customer a vendor # in the correct alphabetical order. However, we recommend you manually set up the vendor #'s when you first put your vendors on Bookstore Manager.
VENDOR NAME: Enter the name of the vendor.
CHK ADDR 1, 2, 3: Enter the vendor’s physical address.
ZIP CODE: Enter the vendor's zip code.
TELEPHONE: Enter the vendor's telephone number.
P O ADDR 1, 2, 3: Enter the vendor's mail to address if different from physical address. Checks will be mailed to this address if different from the physical address.
ACCOUNT #: Enter the account number the vendor has given your company.
(H) TO HOLD: Leave blank, or to put vendor on hold, enter "H" so invoices will not be paid until "H" is taken off.
NORMAL TERMS: Enter the amount of discount that is allowed on invoices by this vendor. The discount will automatically be discounted on each invoice that is entered. (This discount will not be taken if the invoice is paid after the discount due date that is entered.)
- 01 = .5 % 05 = 2.5 %
- 02 = 1.0 % 06 = 3.0 %
- 03 = 1.5 % 07 = 4.0 %
- 04 = 2.0 % 08 = 5.0 %
ALPHA INDEX: Enter up to the first six letters of the vendor's name. Three letters work real well but you will have some vendors that all start with the same letters. You can enter four, five, or six letters or even initials, etc. These alpha codes can be used instead of the vendor number when reviewing information in the A/P Maintenance (APM), Inquiry (API) or Entry (APE) routines.
DEFAULT GL#: Enter the general ledger number where you want the vendor amounts distributed. All transactions for this vendor will automatically be credited or debited to this GL# unless it is changed. This number can be overridden when entering invoices or credit memos.
VENDOR YTD $: This amount will be automatically entered when invoices or credits are entered for the vendor.
VENDOR LYR $: The amount from VENDOR YTD will be moved to this field when the program "APHU" History Update is run at the end of December.
TEMPORARY?: If you want to set up a vendor as a temporary vender enter "Y" for yes. If you do not want to set up the vendor as a temporary vendor enter "N" for no. Temporary vendors will be deleted when the program "APVE" = A/P Vendor Edit is run.
ALL OK (Y/N/C): __
- "Y" will save the information.
- "N" will allow you to make changes to information entered.
- "C" will cancel the vendor information.
APM #2 = Change
Enter the vendor account number and the maintenance screen will be displayed. Make the changes needed.
ALL OK (Y/N/C): __
- "Y" will save the changes.
- "N" will allow you to edit changes made.
- "C" will cancel the changes made but will not delete the vendor.
APM #3 = Delete
Enter the vendor account number and the name and address of the vendor will be displayed. If there are unpaid invoices/credit memos on the vendor, ‘Error 04 Balance not Zero’, will be displayed. You may override the warning and delete. If there is no balance to be paid, ‘Are you sure?’, will be displayed. "Y" will delete the vendor.